雖然市面上很多免費憑證
但期限通常很短,需要常手動或自動去更換憑證
這邊測試用 cloudflare cdn 的https 憑證配合backend 端自我簽屬的憑證實現 wordpress 網站啟用 https 協定
首先原始網站自簽憑證,執行前先確認是否已經安裝 openssl 套件
[root@helloworld example]# openssl genrsa -out example.key 2048
Generating RSA private key, 2048 bit long modulus (2 primes)
............................................+++++
....................................................+++++
e is 65537 (0x010001)
[root@helloworld example]# openssl req -key example.key -new -out example.csr
You are about to be asked to enter information that will be incorporated
into your certificate request.
What you are about to enter is what is called a Distinguished Name or a DN.
There are quite a few fields but you can leave some blank
For some fields there will be a default value,
If you enter '.', the field will be left blank.
-----
Country Name (2 letter code) [XX]:TW
State or Province Name (full name) []:TW
Locality Name (eg, city) [Default City]:Taipei
Organization Name (eg, company) [Default Company Ltd]:helloworld
Organizational Unit Name (eg, section) []:IT
Common Name (eg, your name or your server's hostname) []:example.pass.tw
Email Address []:
Please enter the following 'extra' attributes
to be sent with your certificate request
A challenge password []:
An optional company name []:
[root@helloworld example]# openssl x509 -signkey example.key -in example.csr -req -days 3650 -out example.crt
Signature ok
subject=C = TW, ST = TW, L = Taipei, O = helloworld, OU = IT, CN = example.pass.tw
Getting Private key
[root@helloworld example]# ll
total 12
-rw-r--r-- 1 root root 1216 Apr 27 11:14 example.crt
-rw-r--r-- 1 root root 1005 Apr 27 11:11 example.csr
-rw------- 1 root root 1675 Apr 27 11:10 example.key
修改 apache 設定檔,新增以下設定
SSLEngine on
SSLCertificateFile /etc/httpd/ssl/example/example.crt
SSLCertificateKeyFile /etc/httpd/ssl/example/example.key
SSLCertificateChainFile /etc/httpd/ssl/example/example.csr
如果沒有cloudflare 帳號的話,可以免費註冊一個帳號,並且把網域解析託管到 cloudflare
才可以使用他的CDN 功能
新增正解紀錄,Proxy status 選擇 Proxied

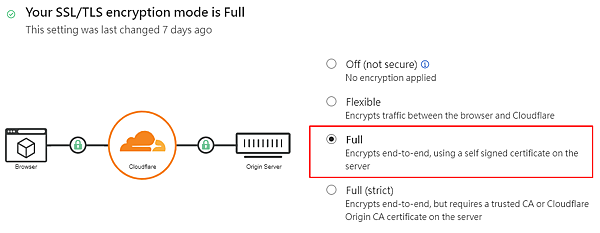
側邊欄移到 SSL/TLS,加密模式選擇
Full
Encrypts end-to-end, using a self signed certificate on the server

回到 wordpress 後台管理介面 -> 設定 -> 一般
將 WordPress 位址 (網址) 及 網站位址 (網址) 欄位皆修改為 https://你的網站網址/

儲存
之後就可以使用 cloudflare CDN 的 https 及 cache 的功能了

