helloworld
目前分類:系統管理 (418)
- Mar 16 Tue 2021 14:37
如何設定linode 主機反解紀錄
- Mar 03 Wed 2021 17:55
解決 CentOS 6 無發透過 yum 安裝/更新問題
[root@centos6 ~]# yum -y install net-snmp net-snmp-utils
Loaded plugins: fastestmirror, security
Setting up Install Process
Determining fastest mirrors
YumRepo Error: All mirror URLs are not using ftp, http[s] or file.
Eg. Invalid release/repo/arch combination/
removing mirrorlist with no valid mirrors: /var/cache/yum/x86_64/6/base/mirrorlist.txt
Error: Cannot find a valid baseurl for repo: base
解決方式
[root@centos6 ~]# cd /etc/yum.repos.d
[root@centos6 yum.repos.d]# vi CentOS-Base.repo
編輯以下三個區塊,用下列設定取代
[base]
name=CentOS-$releasever - Base
# mirrorlist=http://mirrorlist.centos.org/?release=$releasever&arch=$basearch&repo=os&infra=$infra
# baseurl=http://mirror.centos.org/centos/$releasever/os/$basearch/
baseurl=https://vault.centos.org/6.10/os/$basearch/
gpgcheck=1
gpgkey=file:///etc/pki/rpm-gpg/RPM-GPG-KEY-CentOS-6
# released updates
[updates]
name=CentOS-$releasever - Updates
# mirrorlist=http://mirrorlist.centos.org/?release=$releasever&arch=$basearch&repo=updates&infra=$infra
# baseurl=http://mirror.centos.org/centos/$releasever/updates/$basearch/
baseurl=https://vault.centos.org/6.10/updates/$basearch/
gpgcheck=1
gpgkey=file:///etc/pki/rpm-gpg/RPM-GPG-KEY-CentOS-6
# additional packages that may be useful
[extras]
name=CentOS-$releasever - Extras
# mirrorlist=http://mirrorlist.centos.org/?release=$releasever&arch=$basearch&repo=extras&infra=$infra
# baseurl=http://mirror.centos.org/centos/$releasever/extras/$basearch/
baseurl=https://vault.centos.org/6.10/extras/$basearch/
gpgcheck=1
gpgkey=file:///etc/pki/rpm-gpg/RPM-GPG-KEY-CentOS-6
存檔離開
清除暫存檔案
[root@centos6 yum.repos.d]# yum clean all
再試試剛剛的yum 安裝指令看看
如果遇到以下錯誤訊息
[root@centos6 yum.repos.d]# yum -y install net-snmp net-snmp-utils
Loaded plugins: fastestmirror, security
Setting up Install Process
Determining fastest mirrors
Error: Cannot retrieve metalink for repository: epel. Please verify its path and try again
同一個目錄編輯 epel.repo
找到 [epel] 區段
用以下設定取代
[epel]
name=Extra Packages for Enterprise Linux 6 - $basearch
baseurl=http://archives.fedoraproject.org/pub/archive/epel/6/$basearch
#mirrorlist=https://mirrors.fedoraproject.org/metalink?repo=epel-6&arch=$basearch
failovermethod=priority
enabled=1
gpgcheck=1
gpgkey=file:///etc/pki/rpm-gpg/RPM-GPG-KEY-EPEL-6
之後再試試
[root@centos6 yum.repos.d]# yum -y install net-snmp net-snmp-utils
Loaded plugins: fastestmirror, security
Setting up Install Process
Loading mirror speeds from cached hostfile
epel | 4.7 kB 00:00
epel/primary_db | 6.1 MB 00:10
extras | 3.4 kB 00:00
extras/primary_db | 29 kB 00:00
updates | 3.4 kB 00:00
updates/primary_db | 12 MB 01:26
Resolving Dependencies
--> Running transaction check
---> Package net-snmp.x86_64 1:5.5-60.el6_10.2 will be installed
--> Processing Dependency: net-snmp-libs = 1:5.5-60.el6_10.2 for package: 1:net-snmp-5.5-60.el6_10.2.x86_64
--> Processing Dependency: libsensors.so.4()(64bit) for package: 1:net-snmp-5.5-60.el6_10.2.x86_64
--> Processing Dependency: libnetsnmptrapd.so.20()(64bit) for package: 1:net-snmp-5.5-60.el6_10.2.x86_64
--> Processing Dependency: libnetsnmpmibs.so.20()(64bit) for package: 1:net-snmp-5.5-60.el6_10.2.x86_64
--> Processing Dependency: libnetsnmphelpers.so.20()(64bit) for package: 1:net-snmp-5.5-60.el6_10.2.x86_64
--> Processing Dependency: libnetsnmpagent.so.20()(64bit) for package: 1:net-snmp-5.5-60.el6_10.2.x86_64
--> Processing Dependency: libnetsnmp.so.20()(64bit) for package: 1:net-snmp-5.5-60.el6_10.2.x86_64
---> Package net-snmp-utils.x86_64 1:5.5-60.el6_10.2 will be installed
--> Running transaction check
---> Package lm_sensors-libs.x86_64 0:3.1.1-17.el6 will be installed
---> Package net-snmp-libs.x86_64 1:5.5-60.el6_10.2 will be installed
--> Finished Dependency Resolution
Dependencies Resolved
=================
Package Arch Version Repository Size
=================
Installing:
net-snmp x86_64 1:5.5-60.el6_10.2 updates 309 k
net-snmp-utils x86_64 1:5.5-60.el6_10.2 updates 177 k
Installing for dependencies:
lm_sensors-libs x86_64 3.1.1-17.el6 base 38 k
net-snmp-libs x86_64 1:5.5-60.el6_10.2 updates 1.5 M
Transaction Summary
=================
Install 4 Package(s)
Total download size: 2.1 M
Installed size: 6.7 M
Downloading Packages:
(1/4): lm_sensors-libs-3.1.1-17.el6.x86_64.rpm | 38 kB 00:00
(2/4): net-snmp-5.5-60.el6_10.2.x86_64.rpm | 309 kB 00:00
(3/4): net-snmp-libs-5.5-60.el6_10.2.x86_64.rpm | 1.5 MB 00:01
(4/4): net-snmp-utils-5.5-60.el6_10.2.x86_64.rpm | 177 kB 00:00
---------------------------------------------------------------------------------------------------
Total 619 kB/s | 2.1 MB 00:03
Running rpm_check_debug
Running Transaction Test
Transaction Test Succeeded
Running Transaction
Installing : lm_sensors-libs-3.1.1-17.el6.x86_64 1/4
Installing : 1:net-snmp-libs-5.5-60.el6_10.2.x86_64 2/4
Installing : 1:net-snmp-utils-5.5-60.el6_10.2.x86_64 3/4
Installing : 1:net-snmp-5.5-60.el6_10.2.x86_64 4/4
Verifying : 1:net-snmp-libs-5.5-60.el6_10.2.x86_64 1/4
Verifying : 1:net-snmp-utils-5.5-60.el6_10.2.x86_64 2/4
Verifying : 1:net-snmp-5.5-60.el6_10.2.x86_64 3/4
Verifying : lm_sensors-libs-3.1.1-17.el6.x86_64 4/4
Installed:
net-snmp.x86_64 1:5.5-60.el6_10.2 net-snmp-utils.x86_64 1:5.5-60.el6_10.2
Dependency Installed:
lm_sensors-libs.x86_64 0:3.1.1-17.el6 net-snmp-libs.x86_64 1:5.5-60.el6_10.2
Complete!
- Feb 25 Thu 2021 11:07
在linux 使用split 切割檔案
範例: 將 CentOS-8.3.2011-x86_64-dvd1.iso 分成每個為700MB 的檔案
[root@lab workdir]# split -b 700M CentOS-8.3.2011-x86_64-dvd1.iso "CentOS-8.3.2011-x86_64-dvd1.iso.part-"
預設會以小寫英文為流水號
[root@lab workdir]# ls -lh
total 18G
-rw-r--r-- 1 root root 8.7G Feb 25 10:55 CentOS-8.3.2011-x86_64-dvd1.iso
-rw-r--r-- 1 root root 700M Feb 25 10:57 CentOS-8.3.2011-x86_64-dvd1.iso.part-aa
-rw-r--r-- 1 root root 700M Feb 25 10:57 CentOS-8.3.2011-x86_64-dvd1.iso.part-ab
-rw-r--r-- 1 root root 700M Feb 25 10:57 CentOS-8.3.2011-x86_64-dvd1.iso.part-ac
-rw-r--r-- 1 root root 700M Feb 25 10:57 CentOS-8.3.2011-x86_64-dvd1.iso.part-ad
-rw-r--r-- 1 root root 700M Feb 25 10:57 CentOS-8.3.2011-x86_64-dvd1.iso.part-ae
-rw-r--r-- 1 root root 700M Feb 25 10:57 CentOS-8.3.2011-x86_64-dvd1.iso.part-af
-rw-r--r-- 1 root root 700M Feb 25 10:57 CentOS-8.3.2011-x86_64-dvd1.iso.part-ag
-rw-r--r-- 1 root root 700M Feb 25 10:57 CentOS-8.3.2011-x86_64-dvd1.iso.part-ah
-rw-r--r-- 1 root root 700M Feb 25 10:57 CentOS-8.3.2011-x86_64-dvd1.iso.part-ai
-rw-r--r-- 1 root root 700M Feb 25 10:57 CentOS-8.3.2011-x86_64-dvd1.iso.part-aj
-rw-r--r-- 1 root root 700M Feb 25 10:57 CentOS-8.3.2011-x86_64-dvd1.iso.part-ak
-rw-r--r-- 1 root root 700M Feb 25 10:57 CentOS-8.3.2011-x86_64-dvd1.iso.part-al
-rw-r--r-- 1 root root 435M Feb 25 10:57 CentOS-8.3.2011-x86_64-dvd1.iso.part-am
也可以換成 -n 參數來指定要切分成幾等分
[root@lab workdir]# split -n 10 CentOS-8.3.2011-x86_64-dvd1.iso "CentOS-8.3.2011-x86_64-dvd1.iso.part-"
[root@lab workdir]# ls -lh
total 18G
-rw-r--r-- 1 root root 8.7G Feb 25 10:55 CentOS-8.3.2011-x86_64-dvd1.iso
-rw-r--r-- 1 root root 884M Feb 25 11:01 CentOS-8.3.2011-x86_64-dvd1.iso.part-aa
-rw-r--r-- 1 root root 884M Feb 25 11:02 CentOS-8.3.2011-x86_64-dvd1.iso.part-ab
-rw-r--r-- 1 root root 884M Feb 25 11:02 CentOS-8.3.2011-x86_64-dvd1.iso.part-ac
-rw-r--r-- 1 root root 884M Feb 25 11:02 CentOS-8.3.2011-x86_64-dvd1.iso.part-ad
-rw-r--r-- 1 root root 884M Feb 25 11:02 CentOS-8.3.2011-x86_64-dvd1.iso.part-ae
-rw-r--r-- 1 root root 884M Feb 25 11:02 CentOS-8.3.2011-x86_64-dvd1.iso.part-af
-rw-r--r-- 1 root root 884M Feb 25 11:02 CentOS-8.3.2011-x86_64-dvd1.iso.part-ag
-rw-r--r-- 1 root root 884M Feb 25 11:02 CentOS-8.3.2011-x86_64-dvd1.iso.part-ah
-rw-r--r-- 1 root root 884M Feb 25 11:02 CentOS-8.3.2011-x86_64-dvd1.iso.part-ai
-rw-r--r-- 1 root root 884M Feb 25 11:02 CentOS-8.3.2011-x86_64-dvd1.iso.part-aj
透過cat 指定合併檔案
[root@lab workdir]# cat CentOS-8.3.2011-x86_64-dvd1.iso.part-* > CentOS-8.3.2011-x86_64-dvd1.iso-cp
[root@lab workdir]# ls -lh
total 26G
-rw-r--r-- 1 root root 8.7G Feb 25 10:55 CentOS-8.3.2011-x86_64-dvd1.iso
-rw-r--r-- 1 root root 8.7G Feb 25 11:05 CentOS-8.3.2011-x86_64-dvd1.iso-cp
-rw-r--r-- 1 root root 884M Feb 25 11:01 CentOS-8.3.2011-x86_64-dvd1.iso.part-aa
-rw-r--r-- 1 root root 884M Feb 25 11:02 CentOS-8.3.2011-x86_64-dvd1.iso.part-ab
-rw-r--r-- 1 root root 884M Feb 25 11:02 CentOS-8.3.2011-x86_64-dvd1.iso.part-ac
-rw-r--r-- 1 root root 884M Feb 25 11:02 CentOS-8.3.2011-x86_64-dvd1.iso.part-ad
-rw-r--r-- 1 root root 884M Feb 25 11:02 CentOS-8.3.2011-x86_64-dvd1.iso.part-ae
-rw-r--r-- 1 root root 884M Feb 25 11:02 CentOS-8.3.2011-x86_64-dvd1.iso.part-af
-rw-r--r-- 1 root root 884M Feb 25 11:02 CentOS-8.3.2011-x86_64-dvd1.iso.part-ag
-rw-r--r-- 1 root root 884M Feb 25 11:02 CentOS-8.3.2011-x86_64-dvd1.iso.part-ah
-rw-r--r-- 1 root root 884M Feb 25 11:02 CentOS-8.3.2011-x86_64-dvd1.iso.part-ai
-rw-r--r-- 1 root root 884M Feb 25 11:02 CentOS-8.3.2011-x86_64-dvd1.iso.part-aj

- Jan 18 Mon 2021 15:40
FreeBSD 安裝 postfix 取代預設的sendmail MTA
更新ports tree
# portsnap fetch update
安裝 postfix,目前最新版為 postfix-3.5.8
# cd /usr/ports/mail/postfix
# make install clean
設定開機時執行
# vi /etc/rc.conf
sendmail_enable="NO"
sendmail_submit_enable="NO"
sendmail_outbound_enable="NO"
sendmail_msp_queue_enable="NO"
postfix_enable="YES"
重開機即可
# reboot
- Dec 11 Fri 2020 14:28
隱藏apache 網站版本資訊
# vi /usr/local/etc/apache24/httpd.conf
找到 ServerTokens 關鍵字
如果沒有的話,自己加一行
ServerTokens 有以下幾個選項,如果不願意暴露太多資訊,建議設定成 Prod
ServerTokens Full (or not specified)
Server sends (e.g.): Server: Apache/2.4.2 (Unix) PHP/4.2.2 MyMod/1.2
ServerTokens Prod[uctOnly]
Server sends (e.g.): Server: Apache
ServerTokens Major
Server sends (e.g.): Server: Apache/2
ServerTokens Minor
Server sends (e.g.): Server: Apache/2.4
ServerTokens Min[imal]
Server sends (e.g.): Server: Apache/2.4.2
ServerTokens OS
Server sends (e.g.): Server: Apache/2.4.2 (Unix)
最後重啟 apache 服務
可以用 curl -I http://server/ 測試看看是否生效
參考資訊: https://httpd.apache.org/docs/2.4/mod/core.html
- Nov 13 Fri 2020 10:56
解決升級 thunderbird 78 後無法收發信問題
升級thunderbird 版本後
可能會遇到無法收發信件的狀況
出現類似以下的錯誤訊息
訊息傳送失敗。
對方使用不支援的安全通訊協定版本。
必須修正與 xxx.xxx.xxx.xxx 相關的設定。
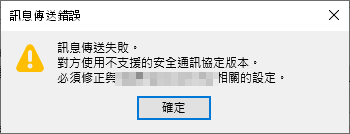
原因是 thunderbird 78 以後預設不支援 TLS 1.0 or TLS 1.1 以下的加密傳輸
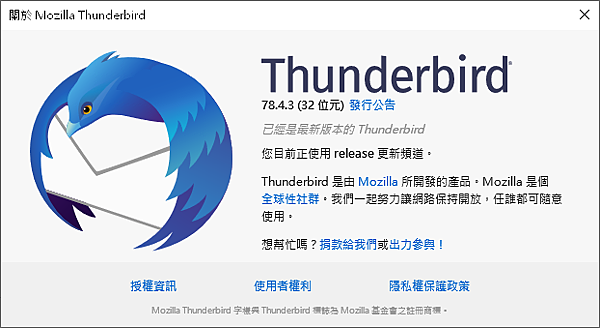
如果mail server 不方便調整的話
解決方式
1. 工具 > 選項 > 在搜尋欄中輸入 about:config
2. 在搜尋結果中會出現 組態編輯器
3. 點進組態編輯器,系統會提醒你 "隨便亂搞會讓保固失效",請接著點選 "我發誓,我一定會小心der"
4. 在組態編輯器中搜尋 "security.tls.version.min"
5. 把數值調整為1
6. 重啟 thunderbird 再試試

- Aug 28 Fri 2020 11:41
解決 pecl 安裝套件時出現無法連線 ssl 錯誤訊息
example:
# pecl install mongodb
出現以下錯誤訊息
Connection to `ssl://pecl.php.net:443' failed: Unable to find the socket transport "ssl" - did you forget to enable it when you configured PHP?)
檢查 php -i | grep 'Registered Stream Socket Transports'
Registered Stream Socket Transports => tcp, udp, unix, udg, ssl, tls, tlsv1.0, tlsv1.1, tlsv1.2, tlsv1.3
明明有 ssl 啊
原來 pecl 使用的php cli 參數會加上 -n
也就是不參考 php.ini 的設定
偷吃步的解決方式
# vi /usr/local/bin/pecl
把 -n 的參數拿掉,存檔離開
exec $PHP -C -q $INCARG -d date.timezone=UTC -d output_buffering=1 -d variables_order=EGPCS -d safe_mode=0 -d register_argc_argv="On" $INCDIR/peclcmd.php "$@"
- Aug 03 Mon 2020 13:24
CentOS Linux mount exfat 格式硬碟
如果出現以下錯誤訊息
| # mount /dev/sdc1 /mnt/usb/ mount: unknown filesystem type 'exfat' |
先檢查是否有以下兩個套件
# rpm -qa | grep exfat
fuse-exfat-1.2.7-1.el7.nux.x86_64
exfat-utils-1.2.7-1.el7.nux.x86_64
如果沒有的話,依照以下步驟安裝
# yum -y install epel-release http://li.nux.ro/download/nux/dextop/el7/x86_64/nux-dextop-release-0-5.el7.nux.noarch.rpm
# yum -y install fuse-exfat exfat-utils
# mount /dev/sdc1 /mnt/usb/
FUSE exfat 1.2.7
- Jul 22 Wed 2020 14:43
更新 cisco catalyst switch IOS
更新 cisco catalyst switch IOS
1. 將ios 檔案放在 tftp server
2. 登入 cisco switch
(1) 測試是否可以連上 tftp server
sw3750#ping 10.1.2.26
Type escape sequence to abort.
Sending 5, 100-byte ICMP Echos to 10.1.2.26, timeout is 2 seconds:
!!!!!
Success rate is 100 percent (5/5), round-trip min/avg/max = 1/1/1 ms
(2) dir 列出目前 flash 上的檔案
sw3750#dir
Directory of flash:/
2 drwx 256 Mar 1 1993 00:08:18 +00:00 c3750-ipservicesk9-mz.150-2.SE11
528 -rwx 110 Mar 1 1993 00:14:45 +00:00 info
530 -rwx 796 Mar 2 1993 04:51:48 +00:00 vlan.dat
531 -rwx 4120 Mar 1 1993 00:02:43 +00:00 multiple-fs
532 -rwx 3012 Mar 1 1993 00:02:43 +00:00 config.text
533 -rwx 3817 Mar 1 1993 00:02:43 +00:00 private-config.text
32514048 bytes total (10212864 bytes free)
(3) 移除原來存在 flash 的檔案
sw3750#delete /f /r flash1:c3750-ipservicesk9-mz.150-2.SE11
(4) 再次確認是否已經移除
sw3750#dir
Directory of flash:/
528 -rwx 110 Mar 1 1993 00:14:45 +00:00 info
530 -rwx 796 Mar 2 1993 04:51:48 +00:00 vlan.dat
531 -rwx 4120 Mar 1 1993 00:02:43 +00:00 multiple-fs
532 -rwx 3012 Mar 1 1993 00:02:43 +00:00 config.text
533 -rwx 3817 Mar 1 1993 00:02:43 +00:00 private-config.text
32514048 bytes total (32499712 bytes free)
(5) 從 tftp server 上傳ios 檔案到 switch 的 flash 上
sw3750#copy tftp flash1
Address or name of remote host []? 10.1.2.26
Source filename []? c3750-ipbasek9-mz.122-55.SE12.bin
Destination filename [flash1]? c3750-ipbasek9-mz.122-55.SE12.bin
Accessing tftp://10.1.2.26/c3750-ipbasek9-mz.122-55.SE12.bin...
Loading c3750-ipbasek9-mz.122-55.SE12.bin from 10.1.2.26 (via Vlan254): !!!!!!!!!!!!!!!!!!!!!!!!!!!!!!!!!!!!!!!!!!!!!!!!
[OK - 12111413 bytes]
12111413 bytes copied in 140.065 secs (86470 bytes/sec)
(6) 檢查上傳結果
sw3750#dir
Directory of flash:/
2 -rwx 12111413 Mar 1 1993 16:23:12 +00:00 c3750-ipbasek9-mz.122-55.SE12.bin
528 -rwx 110 Mar 1 1993 00:14:45 +00:00 info
530 -rwx 796 Mar 2 1993 04:51:48 +00:00 vlan.dat
531 -rwx 4120 Mar 1 1993 00:02:43 +00:00 multiple-fs
532 -rwx 3012 Mar 1 1993 00:02:43 +00:00 config.text
533 -rwx 3817 Mar 1 1993 00:02:43 +00:00 private-config.text
32514048 bytes total (20387840 bytes free)
(7) sh boot 檢查 BOOT path-list 狀態,目前是空的
sw3750#sh boot
BOOT path-list :
Config file : flash:/config.text
Private Config file : flash:/private-config.text
Enable Break : no
Manual Boot : no
Allow Dev Key : yes
HELPER path-list :
Auto upgrade : yes
Auto upgrade path :
NVRAM/Config file
buffer size: 524288
Timeout for Config
Download: 0 seconds
Config Download
via DHCP: disabled (next boot: disabled)
(8) 指定開機的 IOS
sw3750(config)#boot system switch all flash:c3750-ipbasek9-mz.122-55.SE12.bin
sw3750(config)#end
sw3750#show boot
BOOT path-list : flash:c3750-ipbasek9-mz.122-55.SE12.bin
Config file : flash:/config.text
Private Config file : flash:/private-config.text
Enable Break : no
Manual Boot : no
Allow Dev Key : yes
HELPER path-list :
Auto upgrade : yes
Auto upgrade path :
NVRAM/Config file
buffer size: 524288
Timeout for Config
Download: 0 seconds
Config Download
via DHCP: disabled (next boot: disabled)
(9) 存檔,重開機
sw3750#write
Building configuration...
[OK]
sw3750#reload
Proceed with reload? [confirm]y
- Jul 20 Mon 2020 11:56
清空 cisco switch 設定,回復初始出廠預設狀態
- Jul 16 Thu 2020 15:30
使用 putty 連線cisco switch console
- Jun 29 Mon 2020 15:58
netgear r7800 分享器的 snmp 功能
發現 netgear r7800 預設的韌體沒有 snmp 功能
所以無法遠端監控流量
一個路由器沒有 snmp 總覺得哪邊怪怪的
爬了一下網路上建議的方法是重新安裝 DD-WRT

參考資料
https://zh.wikipedia.org/wiki/DD-WRT
https://wiki.dd-wrt.com/wiki/index.php/Netgear_R7800
ftp://ftp.dd-wrt.com/betas/2020/06-25-2020-r43516/netgear-r7800/
筆記下來,抽空測試
- Jun 23 Tue 2020 11:59
安裝訊騰 QQ Linux版本
https://im.qq.com/linuxqq/
雖然還是 beta 版本,今年的四月有最新的更新也算是有誠意了

- May 27 Wed 2020 10:57
限制google bot 爬網站的頻率
預設google bot 或是spider 會根據你的網站效能來評估抓取網站內容的頻率
但是如果你的網站真的已經被爬到吃不消
或是流量費超支
或是後端有其他瓶頸,google 也無從得知
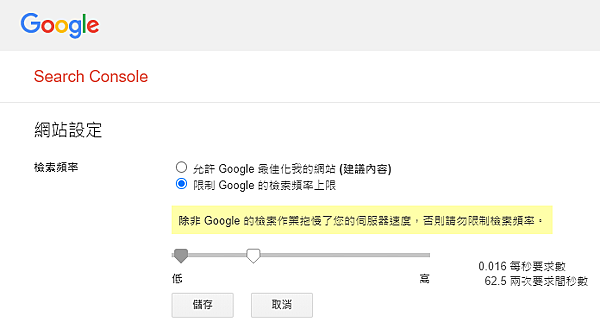
這時候可以透過 google search console 暫時限制 google bot 爬網頁的頻率
進入
https://www.google.com/webmasters/tools/settings
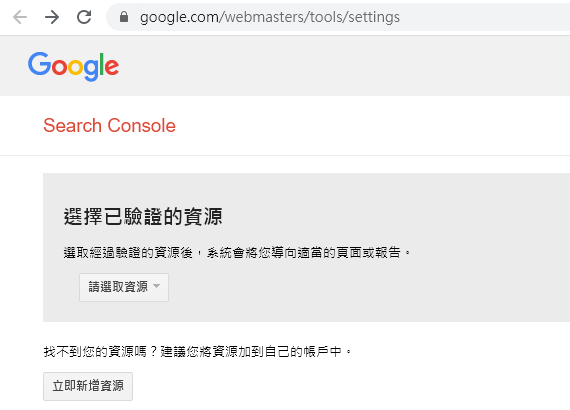
請選取資源
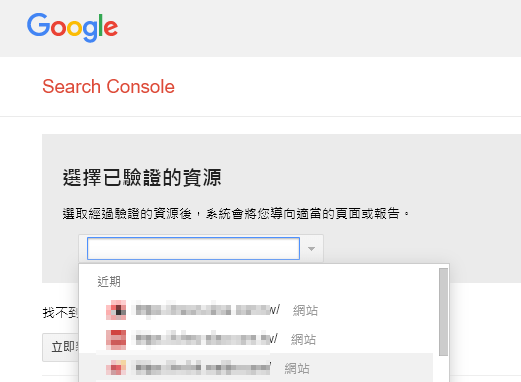
選擇 限制 Google 的檢索頻率上限
並調整到一個適合的檢索頻率
儲存
- May 19 Tue 2020 11:15
解決因X-Frame-Options 無法載入 iframe 問題
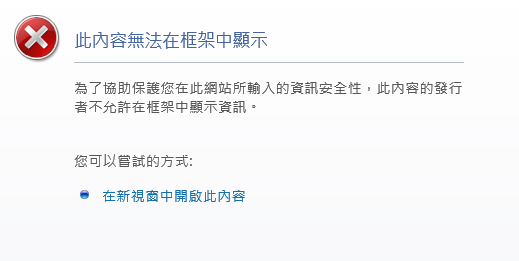
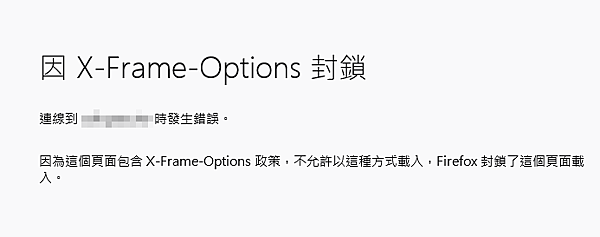
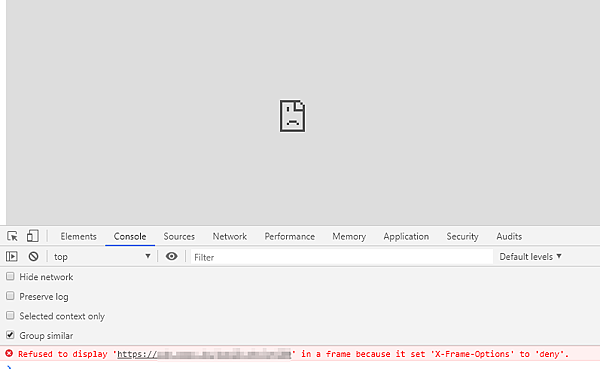
以下是各大瀏覽器的錯誤訊息
[IE]
此內容無法在框架中顯示
為了協助保護您在此網站所輸入的資訊安全性,此內容的發行者不允許在框架中顯示資訊。
您可以嘗試的方式:
在新視窗中開啟此內容
[Firefox]
因 X-Frame-Options 封鎖
連線到 example.com 時發生錯誤。
因為這個頁面包含 X-Frame-Options 政策,不允許以這種方式載入,Firefox 封鎖了這個頁面載入。
[google chrome]
Refused to display 'https://example.com/xxx.html' in a frame because it set 'X-Frame-Options' to 'deny'.
如果你有iframe 中網址的管理權限
請檢察apache 設定檔是否有以下設定
Header always set X-Frame-Options "xxx"
設定這個參數可以防止你的網站被攻擊
有三種設定值
1. DENY
不允許插入iframe 中
2. SAMEORIGIN
只允許插入同一個域名的網頁iframe中
3. ALLOW-FROM uri
只能插入指定的域名中
如: X-Frame-Options: ALLOW-FROM https://helloworld.pixnet.net/
- May 18 Mon 2020 11:29
將google ga code 插入pixnet 痞客幫blog
首先到ga首頁 https://analytics.google.com/
為你的blog 申請一個ga code
系統會自動幫你生成一段java script
你可以選擇將這段script 貼在某個側邊欄中
但是可能會改壞,可能手機版頁面不會載入這個側邊攔
最建議的做法是
到痞客幫應用市集 https://appmarket.pixnet.tw/
下載安裝Google數據分析

並設定事前已經申請好的ga code

格式應該是 UA-123456789-0

- May 05 Tue 2020 14:39
解決: Gmail - TLS Negotiation failed, the certificate doesn't match the host.
如果你是用gmail 當MUA, 也就是利用gmail 來收發外部的郵件
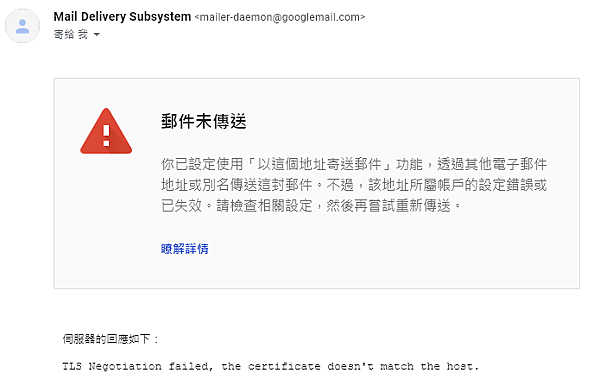
最近在寄信時出現這個錯誤訊息
郵件未傳送
你已設定使用「以這個地址寄送郵件」功能,透過其他電子郵件地址或別名傳送這封郵件。不過,該地址所屬帳戶的設定錯誤或已失效。請檢查相關設定,然後再嘗試重新傳送。
瞭解詳情
伺服器的回應如下:
TLS Negotiation failed, the certificate doesn't match the host.
以postfix + comodo wildcard ssl 為例
1. 取得合法的 ssl 憑證
免費或是購買1~2年憑證 (略)
2. 合併ca憑證
# cd /ssldir/example.com/
# cat COMODORSADomainValidationSecureServerCA.crt COMODORSAAddTrustCA.crt AddTrustExternalCARoot.crt > ca-bundle.crt
3. 修改 postfix main.cf
# vi /usr/local/etc/postfix/main.cf
smtp_use_tls = yes
smtpd_use_tls = yes
smtp_tls_note_starttls_offer = yes
smtpd_tls_key_file = /ssldir/example.com/example.com.key
smtpd_tls_cert_file = /ssldir/example.com/STAR_example_com.crt
smtpd_tls_CAfile = /ssldir/example.com/ca-bundle.crt
smtpd_tls_loglevel = 1
smtpd_tls_received_header = yes
smtpd_tls_session_cache_timeout = 3600s
tls_random_source = dev:/dev/urandom
4. 重啟 postfix 服務
# /usr/local/etc/rc.d/postfix restart
5. 測試
# openssl s_client -connect mail.example.com:25 -starttls smtp
觀察 Certificate chain 是否有噴錯誤訊息,如果都正常的話,就開開心心的寄一封信到別的網域測試看看吧
- Apr 29 Wed 2020 14:59
Dell R320 server boot from USB 隨身碟
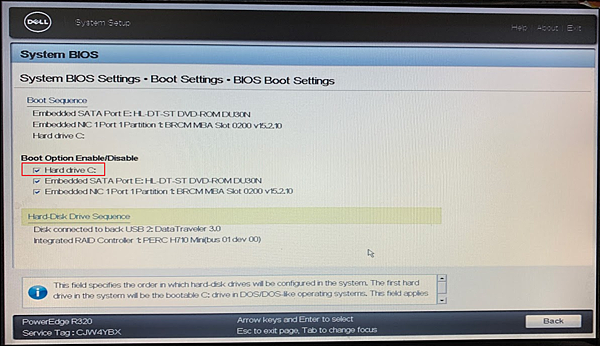
dell r310 server 如果無法利用usb 隨身碟開機的話
請在開機時按F12 進入BIOS 設定畫面
1. 在開機設定的地方確認 Hard drive C: 是否已勾選
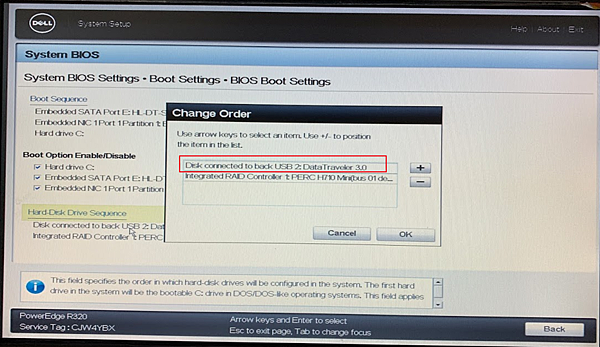
2. 按+ 將usb 開機順序移到內接硬碟/raidcard 前
- Apr 08 Wed 2020 16:16
利用 Google Chrome 移除PDF 密碼
- Mar 31 Tue 2020 15:05
透過 Linode 主機寄信
因為 Linode 政策關係,2019 年底後註冊的新使用者
預設對外不開放 tcp 25 468 587 port
也就是不能收發郵件
目的是為了要減少spam
但新用戶也不用擔心,租了卻不能發信
只要按照以下步驟
還是可以收發信的
1. 在 DNS server 上設定該台 linode 的正解 A 紀錄
2. 在 linode 管理介面設定相對應的反解紀錄
http://blog.sina.com.tw/helloworld/article.php?entryid=695484
3. 開 tickets 說這台linode 有寄信的需求
原則上只要你設定正確,很快就會幫你開通了
參考資料
https://www.linode.com/2019/11/05/a-new-policy-to-help-fight-spam/
https://www.linode.com/docs/email/running-a-mail-server/#sending-email-on-linode










 {{ article.title }}