編輯 logind.conf
# vi /etc/systemd/logind.conf
找到 HandleLidSwitch 關鍵字
把前面的註解拿掉
並修改為
HandleLidSwitch=ignore
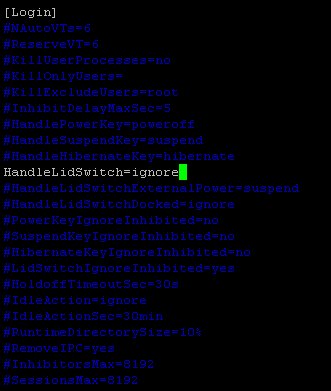
存檔離開,重開機
編輯 logind.conf
# vi /etc/systemd/logind.conf
找到 HandleLidSwitch 關鍵字
把前面的註解拿掉
並修改為
HandleLidSwitch=ignore

存檔離開,重開機
情境:
1. ubuntu server 20.04 僅提供 AP (access poing ) 存取
2. client 透過 ubuntu sever 向 core router 提出 dhcp 請求
首先確認 ubuntu 的 有線和無線網卡均可正常運作
安裝以下必要套件
# apt -y install hostapd
# apt -y install bridge-utils
編輯 hostapd 設定檔
# vi /etc/hostapd/hostapd.conf
interface=wlan0
driver=nl80211
hw_mode=g
channel=1
ieee80211d=1
country_code=TW
ieee80211n=1
wmm_enabled=1
ssid=AP-NAME
macaddr_acl=0
auth_algs=1
ignore_broadcast_ssid=0
wpa=2
wpa_passphrase=passwordddd
wpa_key_mgmt=WPA-PSK
rsn_pairwise=CCMP
# vi /etc/default/hostapd
DAEMON_CONF="/etc/hostapd/hostapd.conf"
設定 netplan
# vi /etc/netplan/00-installer-config.yaml
network:
version: 2
renderer: networkd
ethernets:
eth0:
dhcp4: no
wlan0:
dhcp4: no
bridges:
br0:
interfaces:
- eth0
- wlan0
addresses:
- 10.10.10.247/24
gateway4: 10.10.10.252
nameservers:
addresses: [10.10.10.26,8.8.8.8]
啟用 hostapd
# systemctl unmask hostapd
# systemctl start hostapd
最後找一台client 測試連線
Ubuntu Linux 20.04 網路設定由 netplan 管理
如果一開始設定是 dhcp client 的話,/etc/netplan/00-installer-config.yaml 設定類似如下
作業系統環境: ubuntu-20.04.2.0-desktop-amd64
無線網卡: 【EDIMAX 訊舟】EW-7822UAD AC1200 雙頻 長距離USB 3.0無線網路卡

1. 至官方網站下載 driver
https://www.edimax.com/edimax/download/download/data/edimax/global/download/product/wireless_adapters/wireless_adapters_ac1200_dual-band/ew-7822uad/

2. 解壓縮
# unzip EW-7822UAD_Linux_Driver_1.0.0.1.zip
3. 安裝 driver
安裝需要的套件套件
# apt-get update
# apt install net-tools make make-guile gcc
安裝驅動程式
# cd ./Linux/driver
# make && make install
4. 重開機
# reboot
5. 檢查是否啟用
# ifconfig -a
查看是否多一個interface
執行 wifi up
root@OpenWrt:/etc/config# wifi up
wifi status 觀察是否啟用,但"up": false,
root@OpenWrt:/etc/config# wifi status
{
"radio0": {
"up": false,
"pending": false,
"autostart": true,
"disabled": false,
"retry_setup_failed": true,
"config": {
"channel": "11",
"hwmode": "11g",
"path": "pci0000:00/0000:00:14.0/usb3/3-2/3-2:1.0",
"htmode": "HT20"
},
"interfaces": [
{
"section": "default_radio0",
"config": {
"mode": "ap",
"encryption": "psk-mixed",
"ifname": "wlan0",
"wds": true,
"ssid": "aptest",
"key": "password",
"network": [
"lan"
],
"mode": "ap"
}
}
]
}
}
查看log,發現少了一個工具 ./mac80211.sh: eval: line 793: /usr/sbin/hostapd: not found
root@OpenWrt:/etc/config# logread | grep radio
Tue Aug 24 07:11:13 2021 daemon.notice netifd: radio0 (10651): command failed: Not supported (-95)
Tue Aug 24 07:11:13 2021 daemon.notice netifd: radio0 (10651): ./mac80211.sh: eval: line 793: /usr/sbin/hostapd: not found
Tue Aug 24 07:11:13 2021 daemon.notice netifd: radio0 (10651): cat: can't open '/var/run/wifi-phy0.pid': No such file or directory
Tue Aug 24 07:11:13 2021 daemon.notice netifd: radio0 (10651): WARNING (wireless_add_process): executable path /usr/sbin/hostapd does not match process path (/proc/exe)
Tue Aug 24 07:11:13 2021 daemon.notice netifd: radio0 (10651): Command failed: Invalid argument
Tue Aug 24 07:11:13 2021 daemon.notice netifd: radio0 (10651): Device setup failed: HOSTAPD_START_FAILED
Tue Aug 24 07:11:29 2021 daemon.notice netifd: radio0 (10834): command failed: Not supported (-95)
Tue Aug 24 07:11:29 2021 daemon.notice netifd: radio0 (10834): ./mac80211.sh: eval: line 793: /usr/sbin/hostapd: not found
Tue Aug 24 07:11:29 2021 daemon.notice netifd: radio0 (10834): cat: can't open '/var/run/wifi-phy0.pid': No such file or directory
Tue Aug 24 07:11:29 2021 daemon.notice netifd: radio0 (10834): WARNING (wireless_add_process): executable path /usr/sbin/hostapd does not match process path (/proc/exe)
Tue Aug 24 07:11:29 2021 daemon.notice netifd: radio0 (10834): Command failed: Invalid argument
Tue Aug 24 07:11:29 2021 daemon.notice netifd: radio0 (10834): Device setup failed: HOSTAPD_START_FAILED
安裝 hostapd
root@OpenWrt:/etc/config# opkg install hostapd
Installing hostapd (2019-08-08-ca8c2bd2-7) to root...
Downloading http://downloads.openwrt.org/releases/19.07.8/packages/x86_64/base/hostapd_2019-08-08-ca8c2bd2-7_x86_64.ipk
Configuring hostapd.
重新啟用 wifi
root@OpenWrt:/etc/config# wifi up
確認是否正常啟用
root@OpenWrt:/etc/config# wifi status
{
"radio0": {
"up": true,
"pending": false,
"autostart": true,
"disabled": false,
"retry_setup_failed": false,
"config": {
"channel": "11",
"hwmode": "11g",
"path": "pci0000:00/0000:00:14.0/usb3/3-2/3-2:1.0",
"htmode": "HT20"
},
"interfaces": [
{
"section": "default_radio0",
"config": {
"mode": "ap",
"encryption": "psk-mixed",
"ifname": "wlan0",
"wds": true,
"ssid": "aptest",
"key": "password",
"network": [
"lan"
],
"mode": "ap"
}
}
]
}
}
1. 首先找一台linux ,並提升至 root 權限,至 https://www.finnix.org/Download 下載最新版的 iso
目前最新版本為 122
# cd /workdir/
# wget https://www.finnix.org/releases/122/finnix-122.iso
2. 掛載 iso 檔
mkdir /mnt/finnixiso
# mount -o loop /workdir/finnix-122.iso /mnt/finnixiso
# mkdir /workdir/myfinnix-122
3. 因為mount 上來的iso 是唯讀狀態,所以我們要複製一份檔案至 /workdir/myfinnix-122
# rsync -a /mnt/finnixiso/ /workdir/myfinnix-122/
4. 解壓檔案系統
# cd /workdir/myfinnix-122/isolinux/live
# unsquashfs filesystem.squashfs
5. 這時候可以將需要的檔案放進解壓縮出來的檔案系統
# cd squashfs-root/home/
例如,把 openwrt-19.07.8-x86-64-combined-ext4.img 放進 ./home/openwrt/
# mkdir openwrt
# cd openwrt/
# cp /path/openwrt-19.07.8-x86-64-combined-ext4.img .
6. 重新壓縮檔案系統
# cd /workdir/myfinnix-122/isolinux/live
# rm -r filesystem.squashfs
# mksquashfs squashfs-root filesystem.squashfs
# rm -rf squashfs-root
7. 製作 iso 檔
# cd ../
# genisoimage -l -r -J -V "myfinnix-122" -b isolinux/isolinux.bin -no-emul-boot -boot-load-size 4 -boot-info-table -c isolinux/boot.cat -o ../myfinnix-122.iso ./
以上步驟即可完成客製化 finnix livecd
也可以利用 rufus 工具將客製化 iso 製作成開機 usb 隨身碟
1. 安裝 haproxy
# cd /usr/ports/net/haproxy
# make install clean
2. 安裝完後不會自動產生預設的設定檔,所以要自己建立
# vi /usr/local/etc/haproxy.conf
global
daemon
maxconn 4096
defaults
log global
mode http
timeout connect 5s
timeout client 10s
timeout server 10s
#以mysql 為例
listen mydb
bind 0.0.0.0:3306
mode tcp
balance roundrobin
server db11 192.168.2.11:3306 check
server db11 192.168.2.12:3306 check
# web 管理介面,可以透過這個網址檢視backend 狀態
listen webinterface
bind 0.0.0.0:8080
mode http
stats enable
stats uri /
stats realm Strictly\ Private
stats auth admin:12345 #這邊分別是登入的帳號:密碼
3. 設定重開機時,自動啟用 haproxy
# /usr/local/etc/rc.d/haproxy enable
4. 第一次手動啟動 haproxy
# /usr/local/etc/rc.d/haproxy onestart
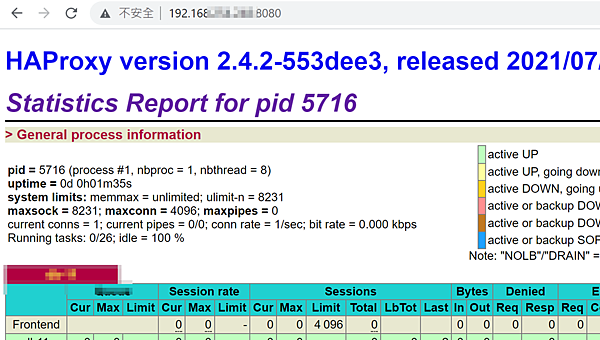
Linux mount windows 分享的資料匣指令如下
1. 建立 Linux 本機目錄
mkdir /mnt/windir
2. 掛載分享空間,帳號密碼,及路徑依需求調整
mount -t cifs -o username=user1,password=a12345678 "\\\192.168.1.10\MY DIR" /mnt/windir/
3. 查看是否 mount 成功
df -h
4. 卸載
umount /mnt/windir
linux server 跑久了之後,系統時間難免會有誤差
以前的習慣是執行 ntpdate [ntp-server]
發現 CentOS 沒有這個 ntp client 的指令
[root@example ~]# ntpdate time.stdtime.gov.tw
-bash: ntpdate: command not found
所以試試用 yum 安裝 ntp 套件,喔喔,找不到這個套件!!??
[root@example ~]# yum -y install ntp
Last metadata expiration check: 0:02:43 ago on Mon 02 Aug 2021 11:00:28 AM CST.
No match for argument: ntp
Error: Unable to find a match: ntp
原來 CentOS 8 要安裝 chrony 套件來取代 ntp
[root@example ~]# yum -y install chrony
Last metadata expiration check: 0:04:50 ago on Mon 02 Aug 2021 11:00:28 AM CST.
Dependencies resolved.
=========================================
Package Architecture Version Repository Size
=========================================
Installing:
chrony x86_64 3.5-2.el8 baseos 270 k
Installing weak dependencies:
timedatex x86_64 0.5-3.el8 baseos 32 k
Transaction Summary
=========================================
Install 2 Packages
Total download size: 302 k
Installed size: 580 k
Downloading Packages:
(1/2): chrony-3.5-2.el8.x86_64.rpm 8.5 MB/s | 270 kB 00:00
(2/2): timedatex-0.5-3.el8.x86_64.rpm 235 kB/s | 32 kB 00:00
--------------------------------------------------------------------------------
Total 265 kB/s | 302 kB 00:01
Running transaction check
Transaction check succeeded.
Running transaction test
Transaction test succeeded.
Running transaction
Preparing : 1/1
Installing : timedatex-0.5-3.el8.x86_64 1/2
Running scriptlet: timedatex-0.5-3.el8.x86_64 1/2
Running scriptlet: chrony-3.5-2.el8.x86_64 2/2
Installing : chrony-3.5-2.el8.x86_64 2/2
Running scriptlet: chrony-3.5-2.el8.x86_64 2/2
Verifying : chrony-3.5-2.el8.x86_64 1/2
Verifying : timedatex-0.5-3.el8.x86_64 2/2
Installed:
chrony-3.5-2.el8.x86_64 timedatex-0.5-3.el8.x86_64
Complete!
修改 /etc/chrony.conf , 改成你習慣的 ntp server
[root@example ~]# vi /etc/chrony.conf
#pool 2.centos.pool.ntp.org iburst
server time.stdtime.gov.tw iburst
重啟 chronyd 服務
[root@example ~]# systemctl restart chronyd
完成
1. 建立帳號密碼檔
1.1 初次建立,或是想清空之前紀錄,請加參數 -c
htpasswd -c /etc/httpd/.htpasswd user1
New password: <輸入user1的密碼>
Re-type new password: <確認密碼>
Adding password for user user1
1.2 接著建立第二位以上的user,千萬不要加參數 -c
htpasswd /etc/httpd/.htpasswd user2
New password: <輸入user1的密碼>
Re-type new password: <確認密碼>
Adding password for user user2
2. 編輯 .htaccess
2.1 假設網站路徑是 /var/www/html/admin
vi /var/www/html/admin/.htaccess
AuthName "admin login"
AuthUserFile /etc/httpd/.htpasswd
AuthType Basic
require valid-user
開啟網頁測試,正確的話,會跳出一個帳號密碼對話框
輸入剛剛建立的帳號密碼即可登入

google workspace 成員使用gmail 要新增其他email 寄件者時出現以下錯誤訊息
Functionality not enabled.
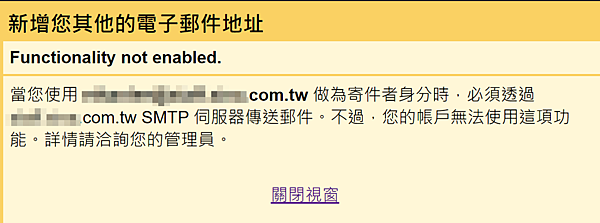
解決方式
系統管理員登入 https://admin.google.com/
應用程式 -> google workspace -> gmail -> 使用者存取 -> 允許視每位使用者情況開放外送閘道
[打勾]如果使用者設定的代管「寄件者」地址不屬於您的郵件網域,則允許使用者透過外部 SMTP 伺服器傳送郵件。
儲存

1. 登入 pfsense 管理介面

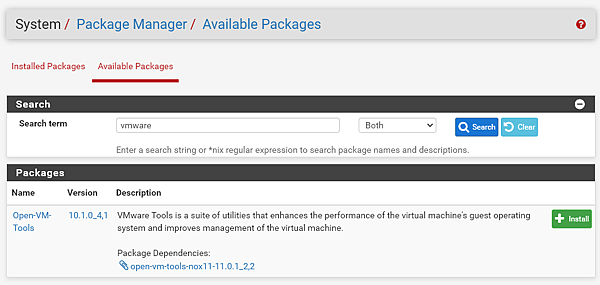
2. System -> Package Manager
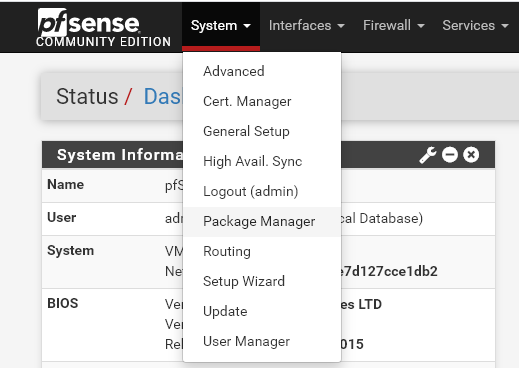
3. Available Packages 搜尋 vmware 關鍵字 -> install
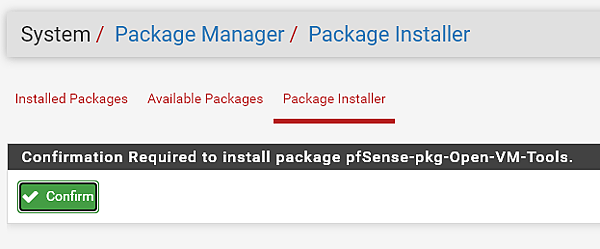
4. Confirm
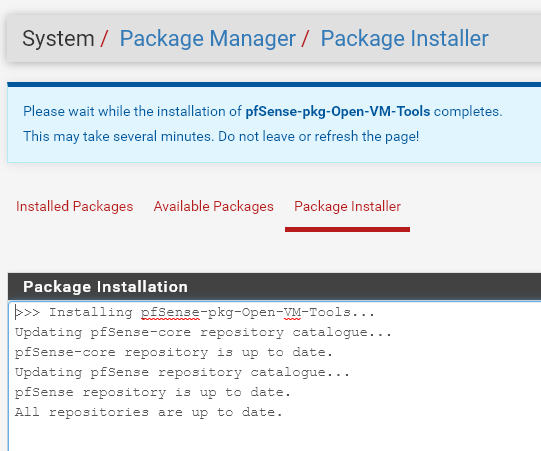
5. 開始安裝
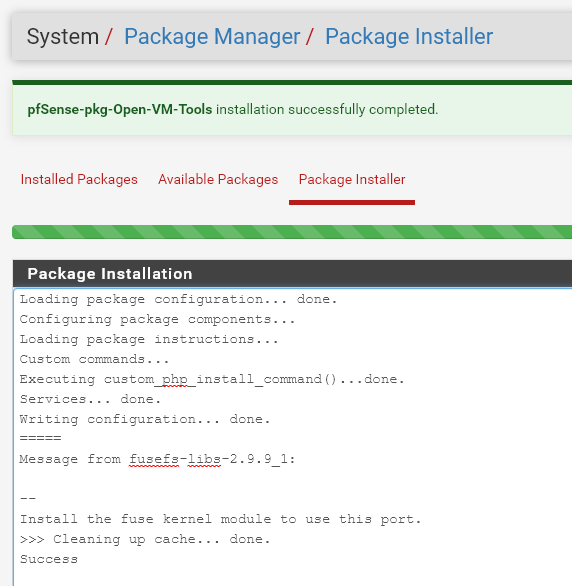
6. 安裝成功
7. 進到 vmware 管理介面查看是否成功
假設往 192.168.10.0/24 要改走 192.168.20.253 路由出去
在macos 下如果要調整 static route 的語法如下
sudo route -n add -net 192.168.10.0/24 192.168.20.253
檢查剛剛設定的route 有沒有成功
netstat -rn
情境
server-1 不用輸入密碼遠端登入 server-2
1. 在sever-1 執行以下程式
[demo@server-1 ~]$ ssh-keygen
Generating public/private rsa key pair.
Enter file in which to save the key (/home/demo/.ssh/id_rsa): Created directory '/home/demo/.ssh'.
Enter passphrase (empty for no passphrase):
Enter same passphrase again:
Your identification has been saved in /home/demo/.ssh/id_rsa.
Your public key has been saved in /home/demo/.ssh/id_rsa.pub.
The key fingerprint is:
SHA256:NVuWJ+wjm/tsVEAOhYew*********9ycOM demo@server-1.example
The key's randomart image is:
+---[RSA 3072]----+
| o..=o |
| o o oo+o. |
| o + * o.B.. |
| . O + * o. |
| . . o S = o. |
| o * . + =.. |
| . + . o E. |
| + + o. |
| o.. .oo |
+----[SHA256]-----+
2. 複製金鑰到遠端sevrer
[demo@server-1 ~]$ ssh-copy-id -i ~/.ssh/id_rsa.pub demo@server-2
/usr/bin/ssh-copy-id: INFO: Source of key(s) to be installed: "/home/demo/.ssh/id_rsa.pub"
The authenticity of host 'server-2 (server-2)' can't be established.
ECDSA key fingerprint is SHA256:XrU/twqZ2xOUZzel******VZV2SLOtiEo.
Are you sure you want to continue connecting (yes/no/[fingerprint])? yes
/usr/bin/ssh-copy-id: INFO: attempting to log in with the new key(s), to filter out any that are already installed
/usr/bin/ssh-copy-id: INFO: 1 key(s) remain to be installed -- if you are prompted now it is to install the new keys
demo@server-2's password:
Number of key(s) added: 1
Now try logging into the machine, with: "ssh 'demo@server-2'"
and check to make sure that only the key(s) you wanted were added.
3. 測試是否可以登入執行程式,並且無須輸入密碼
[demo@server-1 ~]$ ssh demo@server-2 hostname
server-2

1. 安裝 nfs-utils 套件
[root@example test]# yum -y install nfs-utils
2. 依需求編輯 /etc/exports 設定檔
[root@example test]# vi /etc/exports
/home/backup 192.168.1.100 (rw,async,no_root_squash)
/tmp 192.168.1.55(rw,sync)
3. 啟用 nfs server
[root@example test]# systemctl start nfs-server
4. 使用 showmount 測試是否有分享
[root@example test]# showmount -e 127.0.0.1
5. 設定下次重開機後自動啟動
[root@example test]# systemctl enable nfs-server
Created symlink from /etc/systemd/system/multi-user.target.wants/nfs-server.service to /usr/lib/systemd/system/nfs-server.service.
6. 如果重新修改 /etc/exports 設定檔,執行以下指令讓設定檔生效
[root@example test]# exportfs -av

$ sudo apt install openssh-server
安裝完後測試使用 putty 等 clinet 工具登入
但如果出現以下錯誤訊息
Couldn't agree a key exchange algorithm (available: ecdh-sha2-nistp256, ......
應該是你的 putty 版本太舊
請重新下載新版 putty
https://www.chiark.greenend.org.uk/~sgtatham/putty/latest.html
如果 apache proxypass 的 backend 是 https 網址的話
ProxyPass / https://backend.pass.tw/test.html
ProxyPassReverse / https://backend.pass.tw/test.html
可能會出現以下錯誤訊息
[Mon May 03 16:57:15.995493 2021] [ssl:error] [pid 2682:tid 34531960832] [remote x.x.x.x:443] AH01961: SSL Proxy requested for example.pass.tw:443 but not enabled [Hint: SSLProxyEngine]
[Mon May 03 16:57:15.995532 2021] [proxy:error] [pid 2682:tid 34531960832] AH00961: HTTPS: failed to enable ssl support for x.x.x.x:443 (backend.pass.tw)
解決方式
在 apache 新增一行設定
SSLProxyEngine on
然後重啟 apache , 完工
# 最小安裝預設沒有安裝 showmount 指令
[root@example ~]# showmount -e nas
-bash: showmount: command not found
# 安裝 nfs-utils 套件
[root@example ~]# yum install nfs-utils
Last metadata expiration check: 0:49:59 ago on Mon 03 May 2021 01:03:19 PM CST.
Dependencies resolved.
========================================================================================
Package Architecture Version Repository Size
========================================================================================
Installing:
nfs-utils x86_64 1:2.3.3-35.el8 baseos 494 k
Installing dependencies:
gssproxy x86_64 0.8.0-16.el8 baseos 118 k
keyutils x86_64 1.5.10-6.el8 baseos 63 k
libverto-libevent x86_64 0.3.0-5.el8 baseos 16 k
python3-pyyaml x86_64 3.12-12.el8 baseos 193 k
quota x86_64 1:4.04-10.el8 baseos 214 k
quota-nls noarch 1:4.04-10.el8 baseos 94 k
rpcbind x86_64 1.2.5-7.el8 baseos 70 k
Transaction Summary
========================================================================================
Install 8 Packages
Total download size: 1.2 M
Installed size: 3.8 M
Is this ok [y/N]: y
Downloading Packages:
(1/8): libverto-libevent-0.3.0-5.el8.x86_64.rpm 667 kB/s | 16 kB 00:00
(2/8): keyutils-1.5.10-6.el8.x86_64.rpm 2.0 MB/s | 63 kB 00:00
(3/8): gssproxy-0.8.0-16.el8.x86_64.rpm 2.9 MB/s | 118 kB 00:00
(4/8): python3-pyyaml-3.12-12.el8.x86_64.rpm 11 MB/s | 193 kB 00:00
(5/8): quota-nls-4.04-10.el8.noarch.rpm 9.7 MB/s | 94 kB 00:00
(6/8): quota-4.04-10.el8.x86_64.rpm 11 MB/s | 214 kB 00:00
(7/8): nfs-utils-2.3.3-35.el8.x86_64.rpm 12 MB/s | 494 kB 00:00
(8/8): rpcbind-1.2.5-7.el8.x86_64.rpm 8.0 MB/s | 70 kB 00:00
----------------------------------------------------------------------------------------------------------------------------------------
Total 1.0 MB/s | 1.2 MB 00:01
Running transaction check
Transaction check succeeded.
Running transaction test
Transaction test succeeded.
Running transaction
Preparing : 1/1
Running scriptlet: rpcbind-1.2.5-7.el8.x86_64 1/8
Installing : rpcbind-1.2.5-7.el8.x86_64 1/8
Running scriptlet: rpcbind-1.2.5-7.el8.x86_64 1/8
Installing : quota-nls-1:4.04-10.el8.noarch 2/8
Installing : quota-1:4.04-10.el8.x86_64 3/8
Installing : python3-pyyaml-3.12-12.el8.x86_64 4/8
Installing : libverto-libevent-0.3.0-5.el8.x86_64 5/8
Installing : gssproxy-0.8.0-16.el8.x86_64 6/8
Running scriptlet: gssproxy-0.8.0-16.el8.x86_64 6/8
Installing : keyutils-1.5.10-6.el8.x86_64 7/8
Running scriptlet: nfs-utils-1:2.3.3-35.el8.x86_64 8/8
Installing : nfs-utils-1:2.3.3-35.el8.x86_64 8/8
Running scriptlet: nfs-utils-1:2.3.3-35.el8.x86_64 8/8
Verifying : gssproxy-0.8.0-16.el8.x86_64 1/8
Verifying : keyutils-1.5.10-6.el8.x86_64 2/8
Verifying : libverto-libevent-0.3.0-5.el8.x86_64 3/8
Verifying : nfs-utils-1:2.3.3-35.el8.x86_64 4/8
Verifying : python3-pyyaml-3.12-12.el8.x86_64 5/8
Verifying : quota-1:4.04-10.el8.x86_64 6/8
Verifying : quota-nls-1:4.04-10.el8.noarch 7/8
Verifying : rpcbind-1.2.5-7.el8.x86_64 8/8
Installed:
gssproxy-0.8.0-16.el8.x86_64 keyutils-1.5.10-6.el8.x86_64 libverto-libevent-0.3.0-5.el8.x86_64 nfs-utils-1:2.3.3-35.el8.x86_64
python3-pyyaml-3.12-12.el8.x86_64 quota-1:4.04-10.el8.x86_64 quota-nls-1:4.04-10.el8.noarch rpcbind-1.2.5-7.el8.x86_64
Complete!
[root@example ~]# which showmount
/usr/sbin/showmount

目前 CentOS 8.3 安裝iso 大約是 8G
如果是安裝實體機器,而不是安裝vm
不大適合再使用傳統的安裝光碟片安裝
本文測試如何透過 internet 安裝 CentOS 8.x Linux
1. 找一個速度比較快的mirror 站下載 CentOS 8.x 開機iso
該範例為 http://mirror01.idc.hinet.net/centos/8.3.2011/isos/x86_64/CentOS-8.3.2011-x86_64-boot.iso
2. 燒錄成光碟片或是 下載 rufus 做成開機usb 隨身碟
3. 用剛剛製作好的光碟片或是 usb 開機
4. 進入 Installation Destination,設定要安裝的硬碟
注意不要選到剛剛開機的usb 隨身碟
5. 進入 Network & Host Name 設定網路,首先請確認已經接上網路線
可以經由dhcp 或是手動設定ipv4 環境
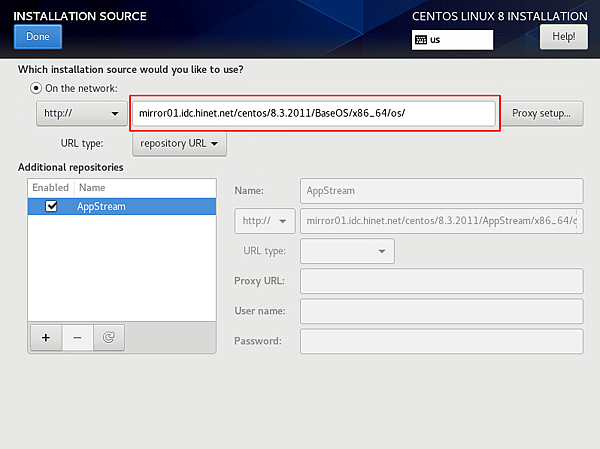
6. 進入Installation Source,設定安裝來源
(1) 勾選 On the network
(2) 下拉通訊協定可以選擇 http , https, ftp , nfs , 我們這邊選 http
(3) 文字框內輸入 http://mirror01.idc.hinet.net/centos/8.3.2011/BaseOS/x86_64/os/
(4) Done
7. 進入 Software Selection, 選擇要安裝的軟體
我的習慣是只安裝最小安裝,畢竟透過網路安裝,如果在機房安裝,頻寬也是一個成本
8. 設定 Root Password
9. 完成上述流程,基本上已經可以開始安裝了
10. 安裝完後,重開機