如果nagios 發現異常要發送警告信給管理者
本機必須要有postfix或sendmail 之類的MTA
helloworld
- May 17 Wed 2023 13:53
nagios 使用外部MTA 驗證寄信
- May 17 Wed 2023 11:21
解決 Debian 11 找不到 apt-add-repository 指令問題
# apt-add-repository contrib
-bash: apt-add-repository: command not found
- Apr 14 Fri 2023 11:20
debian 安裝套件時,跳過對話過程
apt-get -y install 套件名
只會幫你一次安裝好套件
但如果中間出現對話框,還是會卡住
- Apr 12 Wed 2023 11:20
使用 mrtg 紀錄 fortigate cpu / memory 使用率
相關 OID
1.3.6.1.4.1.12356.101.4.1.3 : CPU使用率,單位 %
1.3.6.1.4.1.12356.101.4.1.4 : 記憶體使用率,單位 %
- Apr 12 Wed 2023 08:55
啟用 fortigate snmpd
網路上文章通常只跟你講到第一個步驟
如果還是無法抓到 snmp 資料的話,請試試第二個步驟是否有設定
- Apr 07 Fri 2023 17:11
Ubuntu 20.04.2 LTS 新增 swapfile
系統運作一陣子後
如果發現swap 空間不足,但沒有空的 partition 或是沒有新增硬碟的打算
可以新增一個 swap file 來增加 swap空間
- Mar 23 Thu 2023 11:56
解決 ufw 無法阻擋連線到 docker container 問題
有些人的解法是修改 docker 的iptables 設定,但可能會衍生出其他問題
所以建議以下作法
- Mar 22 Wed 2023 14:28
不透過 repository 搬移 docker images 到其他 hosts
1. 把現有的images 存成 tar 格式
# docker save -o hello_world_nginx.tar hello_world_nginx
- Mar 22 Wed 2023 13:53
客製化自己的 docker images
1. 建立 container
- Mar 22 Wed 2023 11:05
解決 apt update 錯誤訊息
$ sudo apt-get update
Get:1 http://dl.google.com/linux/chrome/deb stable InRelease [1811 B]
Err:1 http://dl.google.com/linux/chrome/deb stable InRelease
The following signatures couldn't be verified because the public key is not available: NO_PUBKEY 4EB27DB2A3B88B8B
- Mar 16 Thu 2023 17:17
解決rsync 無法透過 ssh 同步問題
指令
rsync --list-only -e ssh backup@rsync-server::web/
- Mar 16 Thu 2023 13:14
rsync 透過 ssh 加密同步檔案
首先建立 recive 端到來源端的 passwordless ssh 登入
- Mar 10 Fri 2023 14:38
solaris 網路設定
顯示網路卡
# dladm
- Feb 16 Thu 2023 14:18
跳槽到blogger
- Feb 16 Thu 2023 09:55
修改 symbolic link 的 owner
檔案結構如下
-rw-r--r-- 1 777 777 4 Jan 19 11:50 555.txt
lrwxrwxrwx 1 666 666 7 Feb 16 09:41 555.txt.lnk -> 555.txt
執行 chown 預設只會改變來源的 owner,也就是 555.txt
chown 888:888 555.txt.lnk
如果要變更 link 的 owner ,可以加以下參數
chown -h 888:888 555.txt.lnk
- Jan 17 Tue 2023 15:31
安裝 perl modules 方法
方法一:
到 https://www.cpan.org/ 搜尋要安裝的 module
- Jan 11 Wed 2023 11:01
debian linux 找不到 showmount 指令 ?
showmount: command not found
root@debian:~# apt-cache search showmount
nfs-common - NFS support files common to client and server
root@debian:~# apt install nfs-common
- Jan 11 Wed 2023 10:27
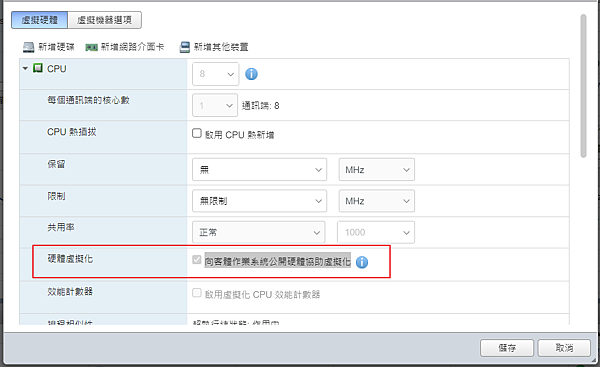
在虛擬機內安裝虛擬機
編輯設定 > 虛擬硬體 > CPU > 硬體虛擬化 > 勾選向客體作業系統公開硬體協助虛擬化
- Jan 11 Wed 2023 10:17
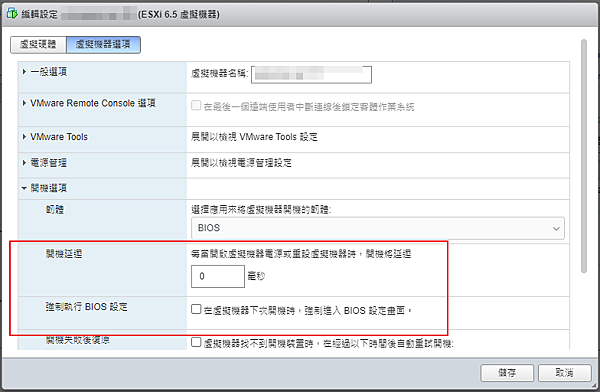
進入 vmware esxi guest os 的 bios
兩個方法
1. 編輯設定 > 虛擬機選項 > 開機延遲 > 填入秒數 > 在開機畫面時按 F2 進入 BIOS
2. 編輯設定 > 虛擬機選項 > 強制執行BIOS設定 > 勾選在虛擬機器下次開機時,強制進入 BIOS 設定畫面 (只會生效一次)
- Jan 07 Sat 2023 17:10
安裝 fail2ban 阻擋暴力破解帳號密碼
阻擋暴力破解除了防火牆、OTP、MFA 外,還可以安裝 fail2ban 來阻止暴力破解
安裝方式
apt install fail2ban
- Dec 19 Mon 2022 16:26
透過 traefik 自動將 http 轉址到 https
類似 apache 等 web server 的 rewrite rule 功能
command:
- "........"
- "........"
- "--entrypoints.web.address=:80"
- "--entrypoints.web.http.redirections.entryPoint.to=websecure" ## force redirect to https
- "--entrypoints.web.http.redirections.entryPoint.scheme=https"
- "--entrypoints.web.http.redirections.entrypoint.permanent=true"
- "--entrypoints.websecure.address=:443"
測試
root@lab:/home/lab# curl -I http://lab.pass.tw/testurl
HTTP/1.1 308 Permanent Redirect
Location: https://lab.pass.tw/testurl
Date: Mon, 19 Dec 2022 08:28:03 GMT
Content-Length: 18
Content-Type: text/plain; charset=utf-8
- Dec 16 Fri 2022 10:05
紀錄crontab 的輸出及錯誤訊息
以前在 troubleshooting 或是 debug crontab 的時候,習慣會去看一下 /var/mail 下面的郵件
正常的輸出及錯誤訊息都會記錄在郵件裡面
但現在的Linux 預設都沒有安裝MTA
所以如果不想額外安裝或是沒有權限可以安裝的話
可以直接輸出在自訂的log 內
如
* * * * * /scripts/backup.sh >> /var/log/backup.log 2>&1
- Dec 08 Thu 2022 15:04
增加gcp 硬碟空間
登入ssh, 檢查調整前硬碟狀況
root@example:~# lsblk
NAME MAJ:MIN RM SIZE RO TYPE MOUNTPOINT
sda 8:0 0 80G 0 disk
└─sda1 8:1 0 80G 0 part /
確定 filesystem 是否為 ext4
root@example:~# df -Th
Filesystem Type Size Used Avail Use% Mounted on
udev devtmpfs 1.8G 0 1.8G 0% /dev
tmpfs tmpfs 371M 76M 295M 21% /run
/dev/sda1 ext4 79G 71G 4.6G 94% /
tmpfs tmpfs 1.9G 0 1.9G 0% /dev/shm
tmpfs tmpfs 5.0M 0 5.0M 0% /run/lock
tmpfs tmpfs 1.9G 0 1.9G 0% /sys/fs/cgroup
登入 gcp console,選擇要加大空間的硬碟 > 編輯 > 直接指定想要的硬碟大小,只能加大,不能縮小
假設原來是80G,想增加至 100G,直接填100G 即可,最大可擴充到64T

在gcp 介面調整硬碟大小後,sda 已經變100G
root@example:~# lsblk
NAME MAJ:MIN RM SIZE RO TYPE MOUNTPOINT
sda 8:0 0 100G 0 disk
└─sda1 8:1 0 80G 0 part /
root@example:~# parted /dev/sda
GNU Parted 3.2
Using /dev/sda
Welcome to GNU Parted! Type 'help' to view a list of commands.
(parted) resizepart
Partition number? 1
Warning: Partition /dev/sda1 is being used. Are you sure you want to continue?
Yes/No? Yes
End? [85.9GB]? 100%
(parted) quit
Information: You may need to update /etc/fstab.
root@example:~# partprobe /dev/sda
root@example:~# resize2fs /dev/sda1
resize2fs 1.43.4 (31-Jan-2017)
Filesystem at /dev/sda1 is mounted on /; on-line resizing required
old_desc_blocks = 10, new_desc_blocks = 13
The filesystem on /dev/sda1 is now 26213888 (4k) blocks long.
檢查sda1 的空間是否已經可以使用
root@example:~# df -h
Filesystem Size Used Avail Use% Mounted on
udev 1.8G 0 1.8G 0% /dev
tmpfs 371M 76M 295M 21% /run
/dev/sda1 99G 71G 24G 76% /
tmpfs 1.9G 0 1.9G 0% /dev/shm
tmpfs 5.0M 0 5.0M 0% /run/lock
tmpfs 1.9G 0 1.9G 0% /sys/fs/cgroup
root@example:~# lsblk
NAME MAJ:MIN RM SIZE RO TYPE MOUNTPOINT
sda 8:0 0 100G 0 disk
└─sda1 8:1 0 100G 0 part /
參考資料
https://cloud.google.com/compute/docs/disks/resize-persistent-disk
- Dec 07 Wed 2022 16:42
編輯 docker-compose.yml 修改 adminer default port
adminer 預設 port 為 8080,雖然不是正規的 80,433
但也很容易跟其他port 衝到
修改方法1,將container 的8080/tcp 對應到 host的 8088/tcp
ports:
- 8088/8080
修改方法2
直接修改 container 的 listen port
ports:
- 8088:8088
command:
- 'php'
- '-S'
- '[::]:8088'
- '-t'
- '/var/www/html'
進到 container 中檢查
# docker exec -it adminer_test sh
/var/www/html $ netstat -na
Active Internet connections (servers and established)
Proto Recv-Q Send-Q Local Address Foreign Address State
tcp 0 0 127.0.0.11:40403 0.0.0.0:* LISTEN
tcp 0 0 :::8081 :::* LISTEN
udp 0 0 127.0.0.11:43328 0.0.0.0:*
Active UNIX domain sockets (servers and established)
Proto RefCnt Flags Type State I-Node Path
- Dec 07 Wed 2022 14:56
centos 安裝 docker 環境
# yum install -y yum-utils
# yum-config-manager --add-repo https://download.docker.com/linux/centos/docker-ce.repo
# yum install docker-ce docker-ce-cli containerd.io docker-compose-plugin
測試
# docker --version
Docker version 20.10.21, build baeda1f
安裝 docker-compose
# curl -L "https://github.com/docker/compose/releases/download/1.27.4/docker-compose-$(uname -s)-$(uname -m)" -o /usr/local/bin/docker-compose
# chmod +x /usr/local/bin/docker-compose
測試
# docker-compose --version
docker-compose version 1.27.4, build 40524192
- Nov 23 Wed 2022 15:17
停用 vim 的 visual mode
vim 的 visual mode 對有些人可能比較方便
但我就是用不習慣XD
要怎麼關閉呢
vi ~/.viminfo (如果沒有的話,請自行建立)
新增一行 set mouse-=a
或是直接下指令新增
echo "set mouse-=a" >> ~/.vimrc
source ~/.vimrc
- Nov 23 Wed 2022 10:32
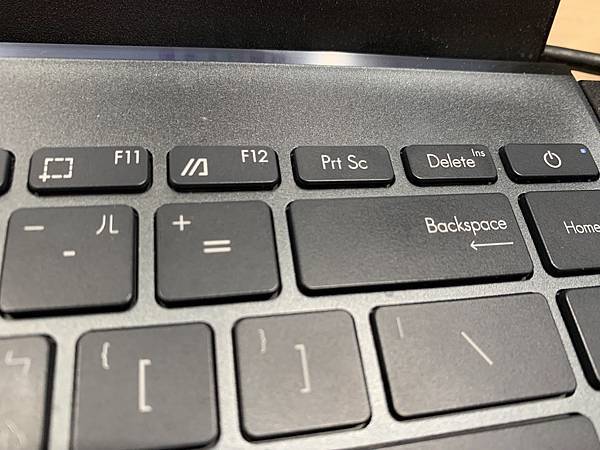
華碩ASUS 筆記型電腦的insert 鍵在哪邊!!??
因為習慣的關係,常會用到insert key
但是剛拿到華碩的notebook 時,一時不知道該如何是好,insert 鍵到底在哪邊
原來是跟 del 同一個鍵,字超級小
要怎麼按 insert 鍵 : Fn + Shift + Delete
抱怨....好難用...設計華碩鍵盤的人在想什麼
- Nov 18 Fri 2022 15:03
docker 建立 apache web server 超快速
搜尋image
# docker search httpd
下載 image
# docker pull httpd
列出host 的images
#docker images
# docker images httpd
在host 建立web的documentroot ,並放一個測試檔案
# mkdir /home/www
# echo "helloworld" > /home/www/index.html
啟動docker,並且把 CONTAINER 的80 port 對應到host 的8000 port
把host 的 /home/www/ mount 在 CONTAINER 的 /usr/local/apache2/htdocs/ 下
# docker run -itd --name labweb -p 8000:80 -v /home/www/:/usr/local/apache2/htdocs/ httpd
進入 CONTAINER 的shell
# docker exec -it labweb bash
打開瀏覽器測試
http://host-ip:8000/
- Nov 18 Fri 2022 09:28
docker 架設 mysql server 超級快
1. 下載mysql image
# docker pull mysql:8
2. 查看目前的images 有哪些
# docker images
3. 啟動 mysql,把容器的3306 port 對應到本機的 3306 port ,初始化密碼為 Lab3306
# docker run --name labdb -p 3306:3306 -e MYSQL_ROOT_PASSWORD=Lab3306 -d mysql:8
4. 查看容器執行狀態
# docker ps -a
5. 進入mysql 的容器中
# docker exec -it labdb bash
6. 跳出容器,但不關閉容器
ctrl-p + q
7. docker start 再次回到容器的 shell 中,後面可以接 CONTAINER ID 或是 NAMES
# docker start bb0ab4e9b251
或是
# docker start labdb
如果是要透過本機連線的話,先安裝mysql client
# apt install -y default-mysql-client
# mysql -h 127.0.0.1 -u root -p
Enter password:
Welcome to the MariaDB monitor. Commands end with ; or \g.
Your MySQL connection id is 9
Server version: 8.0.31 MySQL Community Server - GPL
Copyright (c) 2000, 2018, Oracle, MariaDB Corporation Ab and others.
Type 'help;' or '\h' for help. Type '\c' to clear the current input statement.
MySQL [(none)]> show databases;
+--------------------+
| Database |
+--------------------+
| information_schema |
| mysql |
| performance_schema |
| sys |
| test2 |
+--------------------+
5 rows in set (0.002 sec)
MySQL [(none)]>
- Nov 15 Tue 2022 09:53
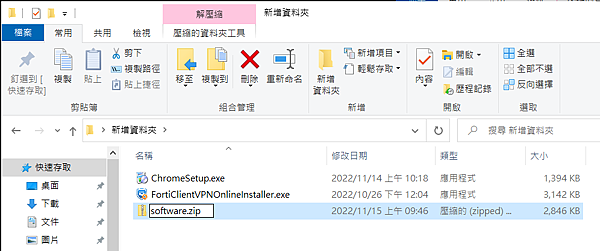
利用 windows 10 內建功能壓縮成 zip 檔
windows 內建的zip 解壓縮功能很方便也很直覺
如果沒有其他特殊需求,比如說要解 rar tar 7z 之類的檔案,其實真的可以不用再去下載其他的解壓縮工具
但壓縮成zip檔就沒那麼直覺了
以下是操作範例
1. 選取要壓縮的檔案或資料匣
2. 點擊右鍵 > 傳送到 > 壓縮的 (zipped) 資料匣 > 可選擇要不要重新命名
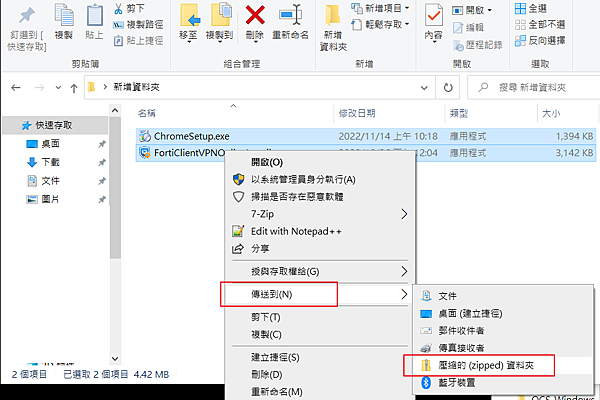
就完成了

 {{ article.title }}